Thursday, September 3, 2009

Another day of potting

Today I made more lids for small 1.5 lb canisters I made yesterday. I also made some 3 and 5 lb pitchers. I got a little carried away with the third pitcher back. It seems to have more hip than belly....


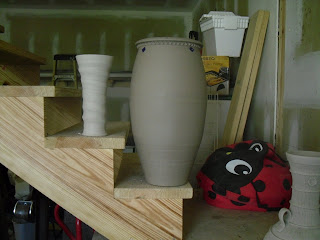
This is a tow piece vase that I made about 20 min. ago. I really like how it turned out. The base is 7.5 lbs and the neck is 2.5 lbs. I threw the base and then took my weed burner to it to stiffen it up. I then threw the neck on my treadle wheel and added it to the stiffened base. I joined the two together and refined the shape of the neck. I am thinking about adding some handle to this piece but I am not sure. We will see how I feel about that in the morning.


Anyone who has seen this blog has got to be getting bored of seeing pots that aren't finished.... I know I would. The reason I don't have any finished pieces on here yet is because my electric kiln is not in an area where there is sufficient power so therefore I haven't been able to do any glaze firings. I am however spending the next couple of days at one of my uncles collecting and splitting wood so I can fire my small wood kiln on Sunday or Monday. I have fired this kiln once before but of course I didn't have enough wood to do anything. I am hoping that there will be enough wood to get the kiln up to temp. maybe I will have some pictures of finished pots on here. Hopefully....

Sheridan

Tuesday, September 1, 2009

Teapots

I did a run of teapots the other day and here is what I came up with. They are all relatively the same except for a few of them that I gave a decorative foot too.


Here is one of the ones with the decorative foot. I left enough clay at the bottow while throwing that I was able to scallop the foot. My fiance thinks that it looks like the teapot from Beauty and the Beast.


I am hoping to be spending tomorrow splitting logs so I can give my test wood kiln another go. I am going to go at it a little bit different this time around but I want to make sure that I have enough wood to even get the kiln to temp.

Sheridan

Wednesday, August 26, 2009

Today in a nutshell

Today I made some 2 lb. canisters and a couple of tea pots.

Bellow are the canisters. I made a batch of about 400 lbs of clay yesterday and instead of letting it age like any smart person I decided to just jump right in and start throwing it. The clay didn't really respond to well with what I was trying to do but I fought through it anyway. I added some reclaim to the batch when I made it yesterday and that has made the clay slightly plastic but not as plastic as I would like. As you can see the canisters are straight sided as opposed to a bellied jar. I really like the look of straight sided canisters plus the straight sides take up less counter space.


Here are the lids for the Canisters. I try and make all of the lid seats all the same size. It really makes it easy to crank out the lids rather than measuring each individual pot and then making the lid. another good thing about making all of the lid seats the same size is that you dont have to make the lids right while the pots are wet. I made these canisters at about noon today. I couldnt make the lids right away because I had to go pick out a wedding cake but that didnt really matter because like I said I already knew what size to make ALL of the lids.


These teapots are probably the most successful ones I have ever made. I think they have a nice shape and where the spouts are connected they have a really nice seam that isnt over worked. Now all they need to do is pour well and I'm in business.


Till next time....

Sheridan

Friday, August 21, 2009

Random Pics...

Here are some random pictures of pots I have made over the past couple of weeks.

This double bellied pot is going to be a lamp... Hopefully.


I just made this vase today. I threw the base first using 7.5 lbs. of clay and then I added the neck which was about 2 lbs. of clay.


I also threw this pitcher today. My pots seem to be getting a little more belly than I am used to having. The reason for this, I think, is that the way I mixed the clay up this time around made it really plastic. I made a test batch of about 20 lbs in a 5 gallon bucket and mixed it to a slurry. I then dumped the bucket into a trough and let it air dry for about a week.


I fired this test kiln about 2 weeks ago and got it up to cone 7. I only had about 30 lbs. of propane so I knew I wouldn't get all the way to cone 10 but I thought I would give it a shot anyway.


Here is a picture of the ware rack after I organized it today. It doesn't look like there are many pots here but on the top shelf almost every pot is stacked in twos or threes.


Here's whats going on.

Its been a while since I have made a post. That's because I haven't been really doing a whole lot with pottery lately. My Fiance has a job interview in Chicago in a week or so, so I have been slowing down production just in case we get a call saying we have to pack our stuff up and head out. Besides posting on blogger I spent most of the morning cleaning up the studio and re-organizing my ware rack so that I am able to get more pots store more pots. My electric kiln that I have isn't working as we speak so I am not able to glaze fire or even bisque fire for that matter. That makes things difficult because I am stuck with all of these really fragile pieces of pottery that I cant store anywhere else but the ware rack....

Recently I posted some videos on YouTube of some different pots that I threw yesterday. If you are interested the links are...

http://www.youtube.com/watch?v=JId3gEp2hiE

http://www.youtube.com/watch?v=5VCziJY5OhU&feature=channel

http://www.youtube.com/watch?v=uF7QeQ3Dpoo&feature=channel

Let me know what you think. I am planning on making some more video once I get some clay made. I just received an order of about 2000 lbs. of dry clay, but as I mentioned earlier I might not be in this exact spot in a month or so. If anyone in blogger world is in Peoria, IL this weekend I am having another pottery sale so you should stop by. I have mostly the same stuff as my last sale seeing as I haven't had a chance to fire anything new. I am also going to be in two up coming arts and craft shows around the area so hopefully I can get rid of some of my inventory so I can start really throwing again.

Sheridan

Wednesday, July 29, 2009

Some Random Photos

This past week I have been making a few pots and mostly just getting things ready to try out my reduction kiln converter. These four pictures are just some random pictures of what has been going on lately. This first picture is of a lidded bowl, or sugar bowl. Whatever you want to call it.


These are the ash test glazes for the first firing of the reduction kiln. I have some other tests that I am going to put in there but this is what I mixed up yesterday. They are pretty simple recipes and that's because I am not one of those potters who wants a ton of stuff in my glazes. It starts to get to a point where you are spending to much money on glaze material when there is only 1-2 percent in the glaze. Not worth it. These are all raw glazes and they contain somewhere between 20-30 percent clay. There are three different sets of tests each containing a different clay. The first is just OM 4 ball clay, the second is Ohio Slip, and the third is Redart. The Ohio slip is a clay similar to Albany Slip. For more information go to www.akclay.com. I am hoping I can get at least one good test from each set so I can make a couple of different ash glazes. I am planning on having an amber ash, temmoku, blue ash, greenish ash, and maybe a glossy opaque ash of some sort.


Here is the Electric kiln reduction converter. I was supposed to get this is 4-6 weeks but about 4 days after I ordered it, it showed up at the front door.


This is the Converter with the kiln on it. This kiln has another section but I am only using this whole kiln as a test kiln so I don't need a whole lot of room for many pots. I might do a shelf or two but that would be it. I just have to figure out how to work the thing now. The instructions aren't really all that good but I think I will be able to figure it out.


Cheers.

Monday, July 20, 2009

Wow

Today I put a coat of adobe on the little test wood kiln that I built. I will post some Pictures of the kiln tomorrow. I finished putting the adobe on at 9ish so there wasn't very much light for a good picture. In other news I just found this video on youtube and it is awesome. The URL is http://www.youtube.com/watch?v=ePDqNYcFWno. It is of two Jingdezhen potters throwing huge amount of clay together. Check it out.

Sheridan

Saturday, July 11, 2009

Follow up pictures part 1

Here is a picture of Christy happy to be stoking


Second chamber. Pretty light load.


This is the big bottle after it was taken out of the kiln.


Nice bit of reduction.

Friday, July 10, 2009

Huge couple of weeks

This past week I spent helping Joe and Christy Cole up at the Windy Ridge Pottery in Wisconsin. It was a really cool experience for me because it was the first time I had really been around a larger wood fired kiln. I have been to Mark Hewitt's pottery in North Carolina and seen those kilns but I only spent about an hour all together around both kilns.

Our first project while I was there was to re coat the kiln with a new and improved adobe mix that contained some local red clay. The original coat looked sort of grey and boring and you can see that one below.


The New coat on the kiln has so much character. It has a nice dark red to orange color due to local clay. The new coat of adobe held up pretty well during the firing. There were a couple of cracks in the first chamber but that didn't really seem to effect anything.


Here is the stack in the first chamber of the kiln. If you go to the Windy Ridge pottery blog you can see a couple of other pictures of the other chamber and the light stacking that it had. In the front of the actual stack there is a row of unglazed pots and to the right of the taller bottle in the middle is one of the pots that I was able to get into the kiln. Throughout the firing that bottle and almost everything to the right of the bigger bottle for some reason got knocked over.


This picture is for Joe. On their blog they had a stokers gallery but Joe didn't seem to have a picture of himself. This picture is so perfect because Joe is stoking what looks like half of a tree into the kiln. That slab of wood lasted quite a while before it finally burned all out.


Here is that Bottle from one of the previous pictures. Some time during the beginning of the firing the taller bottle in the middle of the stack broke so Joe pulled it out of the kiln so the pots behind where is was sitting could get a little more ash. In the process I think my pot got knocked over but I'm pretty sure that wasn't really Joe's fault because it was teetering before he started poking around. It was about one or two hours before we stopped stoking in the first chamber that Joe decided that we should pull the pot out of the kiln so I could take it home with me. I didn't know exactly how well that was going to work but he assured me that everything would be fine. He told me that David Stuempfle does it all the time so I trusted him. Good thing I did because the pot looked pretty sweet for hanging out in the firebox most of the firing. I will post a picture of the next time I post.


While at the pottery I found out how much I dont know about being a wood fired potter. I mean I am able to make the pots and all of that stuff but after seeing how much goes on and how much you really need to know about kiln design and function I figured that I needed a little more training. Joe and Christy helped me come up with a list of possible apprenticeships and/or residency opportunities. Hopefully something comes about. If anyone out there in blogger land knows of any good opportunities that will keep me close to a wood kiln I am all ears.

I also found out about a wood fired workshop while at Joe and Christy's but of course I missed the deadline by about 4 days. I thought I would try my luck and email the guy and lucky for me he still had a spot open so on Aug. 10th I will be making my way to Strawberry Point, Iowa for the workshop. It seems like an awesome experience because we will be building, loading, and firing a wood fired kiln based on a Korean design. It should be fun.

I will post some more pictures from Wisconsin soon. Until then.....

Wednesday, July 1, 2009

Here are some pictures of my first wood kiln. As you can see I am probably breaking every rule when it comes to proper kiln construction but I had to work with what I had. For the floor I used some beat up and broken brick that I had and filled the cracks in with sand. On top of that I took three 2'x3' kiln shelves I had and set them side side making a 6'x3' floor. I then made a 4.5" wall all the way around and up 11 rows. I had some insulating brick so I used those up a little higher on the kiln because I started running out of hard brick. I finished the top of the kiln with 3 more kiln shelves. The stoke hole is on the side because I wanted to conserve kiln space and I didn't want to worry about getting a little to excited and knock over the bagwall. I have some intake air holed in the front of the kiln but there was not even close to enough of them. There was very little draft in the inaugural firing and I blame it on that. The exit flue might be a little small too, but those are quick fixes. I also have to add a layer of adobe over the whole thing so I can fill in some of the cracks and openings. I think that will help with the draft too. For this first firing I just wanted to see if the kiln would even work so we just tossed wood in for about an hour and we got it pretty hot. Maybe 1000-1200 degrees. Not certain but it got hot enough quick enough to crack one of the kiln shelves that is being used as the lid. I had a feeling that might happen but I was willing to take the chance. Anyway here are some of the pics.


Saturday, June 20, 2009

Its been a while

Its been a while since I have made a post but that is for good reason. Lately I have been getting quotes on steel buildings so I can build a studio and sales gallery. It seems like it would be pretty straight forward but Its crazy how many different places have steel buildings and the different kinds of buildings there are and all of the options one can choose. Once I figure out all of the details I will post some picture of where I will eventually build the studio, kiln, and when my fiance and I have enough money a house. I have also been drawing up some kiln plans for the kiln I would like to build later this summer. Thanks to Joe Cole I now a supply of brick I just have to come up with a design that will best suit my needs.

Anyway enough of all of that. Here are some pots that I have been making lately. I haven't had much time to throw but here's what I have so far.


The jar on the left is supposed to have handles on the neck but it was a little to dry before I got to it.


Bowls...


Trimmed Bowls...


This is my first attempt at an umbrella pot. I thought it turned out really nice. It is a little small for my liking though. Since it was my first one I didn't really want to much each section very hard and through the whole thing of center. I really like the shape so I think I am going to continua making these.

Alright well breaks over. Back to work.

Sheridan

Wednesday, June 10, 2009

SALE!!!

I know it is last minute but I would like to let everyone know that I am having a sale June 13th and 14th from 8 to 4. Here are some pictures of pots that I have available.


This is one of my favorite pitchers I have ever made. I love the shape and the way the wood ash interacted with the glaze just worked.


Last but not least are flower pots. I know it is a little late in the season for these guys but this was the best time for me to have a sale. There are some more just off screen to the left but I think this picture gets the point across.

Sheridan

Tuesday, June 9, 2009

Hi

So here is my first post on this blog. For everyone who doesn't know me, which is most likely everyone who visits this blog, here is a little background info. My name is Sheridan Ray and I am a recent graduate from Monmouth College. I am 22 years old and am in the process of setting up a pottery in Metamora, IL. Right now I am working out of my parents garage making stoneware pots which I fire to cone 10 in my electric kilns. The eventual plan is to move the pottery out to the country and build a studio, wood kiln, and eventually a house.

Here are a couple of pots I have been working on lately. I recently went to a Saturday morning farmers market in Peoria and found that I needed to make pots that were a little more fancy so here are some of the forms I came up with.


I am most happy with this last pot. The base is about 10 pounds and the neck is 3. Before Shrinking it is about 2 feet tall. The problem I have with making pots like this is that I always struggle with what to glaze them in. I have an amber ash glaze that I used back at school but that was in our big reduction kiln so I am not sure how that will translate to the oxidation firing. I think it will be fine but who knows. Till next time......

Sheridan